Understanding Layered Architecture in .NET Core: A Practical Guide to Building Scalable Web APIs
Introduction
In modern software development, structuring applications in a way that promotes scalability, maintainability, and testability is crucial. A widely used architectural pattern to achieve this is Layered Architecture.
Layered Architecture is a design pattern that organizes an application into distinct layers, each handling a specific concern. This separation ensures that different parts of the system remain independent, making it easier to manage, extend, and test. It is commonly used in enterprise applications, Web APIs, and large-scale projects where clear separation of concerns is essential.
Imagine an application where everything — database access, business logic, and API endpoints — is written in a single place. Making changes would be complex, testing would be difficult, and reusability would be limited. Layered Architecture solves these issues by dividing the application into logical sections, allowing developers to modify or scale one part of the system without affecting the entire codebase.
Whether you’re an experienced developer looking to implement structured architecture in your Web APIs or just starting with API development, this blog provides a clear understanding of Layered Architecture through simple, practical examples. While the examples use .NET Core, the core concepts can be adapted for other frameworks like Node.js. We’ll focus on core concepts rather than complex implementations, giving you a solid foundation to build upon.
Before we dive into the details, let’s first understand the core idea behind Layered Architecture and why it is widely used in the software industry.
Why Use Layered Architecture?
When developing applications, especially in .NET Core Web APIs, we need to ensure that the code is structured, modular, and easy to maintain. Layered Architecture helps achieve these goals by enforcing a clear separation of concerns, which means each layer is responsible for a specific part of the application.
Here are some key benefits of using Layered Architecture:
✔ Maintainability — Changes in one layer do not affect others, making updates easier.
✔ Scalability — The system can be extended without modifying core components.
✔ Testability — Business logic is isolated, making unit testing more effective.
✔ Security — The API layer does not directly interact with the database, reducing exposure to vulnerabilities.
✔ Reusability — Business logic can be reused across different applications or services.
For example, if a company decides to replace SQL Server with MongoDB, only the Repository Layer needs to be updated — all other layers remain untouched. This kind of flexibility is essential for long-term projects.
Now that we understand why Layered Architecture is beneficial, let’s look at how it is structured in a typical .NET Core Web API application.
What Does Layered Architecture Look Like?
A typical .NET Core Web API using Layered Architecture is structured into multiple layers, each responsible for a specific function. The most common approach includes the following layers:
1️⃣ Controller Layer (API Layer)
This is the entry point for all HTTP requests. It receives requests, interacts with the Service Layer, and returns responses.
2️⃣ Service Layer (Business Logic Layer)
This layer contains the core business logic of the application. It processes data, applies validation, and interacts with the Repository Layer for database access.
3️⃣ Repository Layer (Data Access Layer)
Responsible for fetching and storing data from the database. It abstracts database interactions, making it easy to switch between Entity Framework, Dapper, or any other database technology.
4️⃣ Models (Entities & DTOs)
Defines the structure of data used throughout the application. Entities represent database tables, while DTOs (Data Transfer Objects) are used to format API responses.
5️⃣ Common Utilities (API Response, Middleware, Helpers)
Includes common functionalities such as standardized API responses, error handling, and middleware components that are shared across layers.
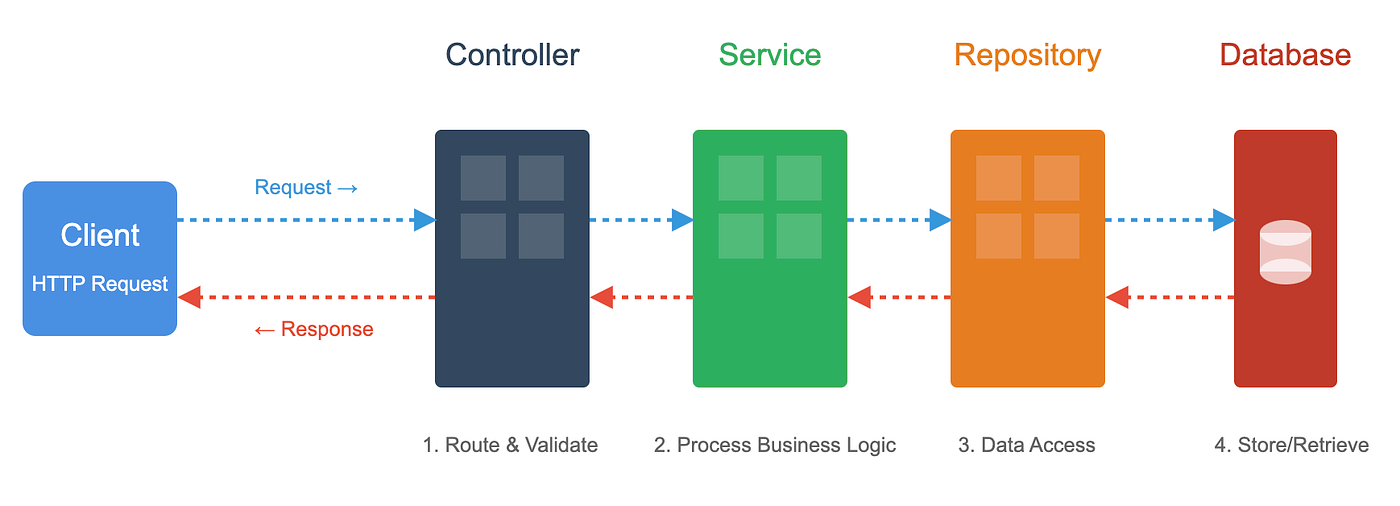
How Do These Layers Interact?
The flow of data in a Layered Architecture follows a structured approach:
Request → [Controller] → [Service] → [Repository] → [Database]
Response ← [Controller] ← [Service] ← [Repository] ← [Database]
Flow Explanation:
- A request is sent to the Controller Layer, typically via an HTTP request.
- The Controller validates the request and calls the Service Layer for business logic processing.
- The Service Layer then retrieves or processes data by interacting with the Repository Layer.
- The Repository Layer fetches data from the database and returns it to the Service Layer.
- The Service Layer formats the response and sends it back to the Controller Layer.
- Finally, the Controller sends the response to the client (API consumer).
Each layer only interacts with the layer directly below it, ensuring that no direct access is made between the API Layer and the Database Layer. This keeps the system structured and easy to manage.
Project Structure in a .NET Core Web API
A well-organized .NET Core Web API that follows Layered Architecture typically looks like this:
LayeredArchitectureAPI
├── Controllers          # API Layer - Handles HTTP requests
│   ├── ProductController.cs
├── Services            # Business Logic Layer
│   ├── ProductService.cs
│   ├── IProductService.cs
├── Repositories        # Data Access Layer
│   ├── ProductRepository.cs
│   ├── IProductRepository.cs
├── Models             # Entities & DTOs
│   ├── Product.cs
│   ├── ProductDto.cs
├── Helpers            # Common utilities (API responses, middleware)
│   ├── ApiResponse.cs
├── Data               # Database context (for Entity Framework)
│   ├── ApplicationDbContext.cs
├── Program.cs         # Application startup & Dependency Injection
├── appsettings.json   # Configuration file (DB connection, logging, etc.)
How This Structure Helps
✔ Modularity — Each layer has a distinct role, keeping the codebase clean and manageable.
✔ Flexibility — The Repository Layer abstracts data access, allowing easy swapping of SQL Server, MongoDB, or any other database without affecting business logic.
✔ Scalability — Business logic and API controllers remain independent, making the system easy to extend.
✔ Testability — Each layer can be unit tested separately.
With this structured approach, the system remains organized and easy to maintain, even as the project grows.
Now that we have a clear understanding of Layered Architecture and its benefits, the next step is to explore each layer in detail.
In the following sections, we will dive into each layer, explaining its role with code sample snippets to illustrate how it works in a .NET Core Web API.
Understanding Each Layer in Detail (With Code Samples)
Now that we have a clear understanding of Layered Architecture and its benefits, it’s time to break down each layer and see how it functions within a .NET Core Web API. Each layer plays a specific role in ensuring clean code, separation of concerns, and maintainability.
We’ll go through:
✔ The role of each layer and how it fits into the architecture.
✔ A simple code snippet for better understanding.
✔ The flow of data between the layers.
1️⃣ Controller Layer (API Layer) — Handling Requests
The Controller Layer is the entry point for all HTTP requests. Its main job is to:
✅ Receive API requests (GET, POST, PUT, DELETE).
✅ Call the Service Layer to process the request.
✅ Return a structured API response.
Example: ProductController.cs
[ApiController]
[Route("api/[controller]")]
public class ProductController : ControllerBase
{
    private readonly IProductService _productService;

    public ProductController(IProductService productService)
    {
        _productService = productService;
    }

    [HttpGet("{id}")]
    public async Task<IActionResult> GetProduct(int id)
    {
        var result = await _productService.GetProductById(id);
        return StatusCode(result.StatusCode, result);
    }

    [HttpPost]
    public async Task<IActionResult> CreateProduct([FromBody] ProductDto productDto)
    {
        var result = await _productService.CreateProduct(productDto);
        return StatusCode(result.StatusCode, result);
    }
}
Key Takeaways from the Controller Layer
✔ Does not contain business logic — It simply forwards the request to the Service Layer.
✔ Follows REST principles — Uses GET, POST, etc. to perform actions.
✔ Returns structured API responses using StatusCode().
2️⃣ Service Layer (Business Logic Layer) — Processing Business Logic
The Service Layer is where the actual logic of the application resides. This layer ensures:
✅ Business rules and validation are applied before data is processed.
✅ The Repository Layer is called only when needed.
✅ Responses are formatted correctly before reaching the Controller Layer.
Example: ProductService.cs
public class ProductService : IProductService
{
    private readonly IProductRepository _productRepository;

    public ProductService(IProductRepository productRepository)
    {
        _productRepository = productRepository;
    }

    public async Task<ApiResponse<ProductDto>> GetProductById(int id)
    {
        var product = await _productRepository.GetById(id);
        if (product == null)
            return ApiResponse<ProductDto>.Fail("Product not found", 404);

        return ApiResponse<ProductDto>.Success(new ProductDto(product), 200);
    }

    public async Task<ApiResponse<int>> CreateProduct(ProductDto productDto)
    {
        if (string.IsNullOrEmpty(productDto.Name) || productDto.Price <= 0)
            return ApiResponse<int>.Fail("Invalid product details", 400);

        var product = new Product
        {
            Name = productDto.Name,
            Price = productDto.Price
        };

        int newProductId = await _productRepository.Create(product);
        return ApiResponse<int>.Success(newProductId, 201);
    }
}
Key Takeaways from the Service Layer
✔ Applies business logic and validation before interacting with the database.
✔ Keeps the Controller Layer clean — The controller does not contain logic.
✔ Uses dependency injection to call the Repository Layer.
3️⃣ Repository Layer (Data Access Layer) — Fetching Data
The Repository Layer is responsible for all database interactions. It ensures that:
✅ The Service Layer does not directly interact with the database.
✅ Any data access approach can be used — Entity Framework (EF Core), Dapper, or even raw SQL queries.
✅ The application remains database-independent, allowing easy migration to MongoDB or another database if needed.
In this blog, we’ll demonstrate using Entity Framework Core for querying and persisting data, but the Repository Layer is flexible enough to support any data access strategy that suits your project needs.
Example: ProductRepository.cs (Using Entity Framework Core)
public class ProductRepository : IProductRepository
{
    private readonly ApplicationDbContext _context;

    public ProductRepository(ApplicationDbContext context)
    {
        _context = context;
    }

    public async Task<Product> GetById(int id)
    {
        return await _context.Products.FindAsync(id);
    }

    public async Task<int> Create(Product product)
    {
        _context.Products.Add(product);
        await _context.SaveChangesAsync();
        return product.Id;
    }
}
Key Takeaways from the Repository Layer
✔ Abstracts database operations — The Service Layer doesn’t handle database logic directly.
✔ Keeps the application flexible — Easy to switch databases if needed.
4️⃣ Models (Entities & DTOs) — Defining Data Structure
Since data moves across multiple layers, we need Entities (for database representation) and DTOs (for API responses).
Example: Product.cs (Entity Model)
public class Product
{
    public int Id { get; set; }
    public string Name { get; set; }
    public decimal Price { get; set; }
}
Example: ProductDto.cs (DTO for API Response)
public class ProductDto
{
    public string Name { get; set; }
    public decimal Price { get; set; }

    public ProductDto(Product product)
    {
        Name = product.Name;
        Price = product.Price;
    }
}
Key Takeaways from Models (Entities & DTOs)
✔ Entities map to database tables, while DTOs format data for APIs.
✔ Prevents exposing raw database models in API responses.
✔ Keeps data structured and secure.
5️⃣ Standardized API Responses — Maintaining Consistency
To ensure every API returns consistent responses, we use a generic API Response class.
Example: ApiResponse.cs
public class ApiResponse<T>
{
    public bool Success { get; set; }
    public string Message { get; set; }
    public int StatusCode { get; set; }
    public T Data { get; set; }

    public static ApiResponse<T> Success(T data, int statusCode)
    {
        return new ApiResponse<T> { Success = true, Data = data, StatusCode = statusCode };
    }

    public static ApiResponse<T> Fail(string message, int statusCode)
    {
        return new ApiResponse<T> { Success = false, Message = message, StatusCode = statusCode };
    }
}
Example API Responses
✅ Success Response (200 OK)
{
  "success": true,
  "message": null,
  "statusCode": 200,
  "data": {
    "name": "Laptop",
    "price": 999.99
  }
}
❌ Error Response (404 Not Found)
{
  "success": false,
  "message": "Product not found",
  "statusCode": 404,
  "data": null
}
Key Takeaways from API Responses
✔ Ensures all API responses follow the same format.
✔ Makes error handling simpler and more structured.
✔ Improves API documentation and usability.
Now that we’ve covered each layer and its implementation, let’s step back and get a final overview of how everything connects in a complete request-response cycle.
Final Thoughts
In this blog, we’ve explored how Layered Architecture organizes .NET Core Web APIs into distinct layers — Controller, Service, Repository, and Models — each with its specific responsibility. Through practical examples, we’ve seen how this architecture enables clear separation of concerns, making our applications more maintainable, testable, and scalable.
If you’re just starting with Web API development, implementing Layered Architecture might seem overwhelming at first. However, the long-term benefits of organized code, easier maintenance, and flexibility to adapt to changing requirements make it worth the initial investment.
While there are other architectural patterns like Clean Architecture and N-Tier Architecture that suit different project needs, mastering Layered Architecture provides a solid foundation for building enterprise-grade applications. Stay tuned for future blogs where we’ll explore these patterns in detail. Happy coding! 🚀
